Easy Tie Dye Patterns: 6 Step-by-Step Folding Ideas
If you are looking for easy tie dye patterns, do not start by memorizing pattern names. Start by understanding how folding, tying, clamping, dye placement, and color timing control the final design.
This beginner-friendly guide covers classic tie dye ideas like crumple and spiral, then adds Chinese-inspired resist-dye methods such as triangle folds, clamp resist, rubber-band density, and indigo-style grid patterns.
What Is the Easiest Tie Dye Pattern for Beginners?
The easiest tie dye pattern for beginners is still the crumple pattern because it does not require perfect folding. But if you want a clearer and more intentional design, try triangle folds, stripe folds, or simple clamp resist methods.
These easy tie dye patterns work best when you understand the fold first, then choose the dye placement. The fold creates symmetry, the rubber bands control density, the clamp creates sharper white spaces, and the dye placement decides where the color appears.
Before You Start: What Controls a Tie Dye Pattern?
Many tie dye tutorials only show the final pattern. Traditional resist-dye methods pay more attention to the structure behind the pattern: how the fabric is folded, where it is tied, how tightly it is held, and where the dye touches the folded shape.
Folding controls symmetry
A triangle fold can create repeated stars, flowers, diamonds, or grid-like motifs. A spiral fold creates a round center. A long accordion fold creates stripes.
Rubber bands control spacing
Fewer bands and wider spaces create looser, larger motifs. More bands and narrower spaces create denser, smaller, more detailed patterns.
Boards create sharper lines
Small boards, craft sticks, clips, or clamps block dye more firmly than rubber bands alone. This can create cleaner white lines and geometric shapes.
Edges and corners matter
Dyeing the corner, the long edge, one side, or the whole folded section can create completely different patterns from the same fold.
Wetness changes softness
Pre-wet fabric usually creates softer spreads. Drier fabric gives sharper placement but can be harder for beginners to control.
Time controls color depth
Longer dye contact often creates deeper color. For stronger results, learn how long tie dye should sit before rinsing.
6 Easy Tie Dye Pattern Methods at a Glance
Instead of only choosing a finished pattern name, choose the method that controls the final look. These six easy tie dye patterns are organized by method, so beginners can choose by difficulty, final look, and pattern control.
Click the image to enlarge it, or use View method to jump to the full step-by-step section below.
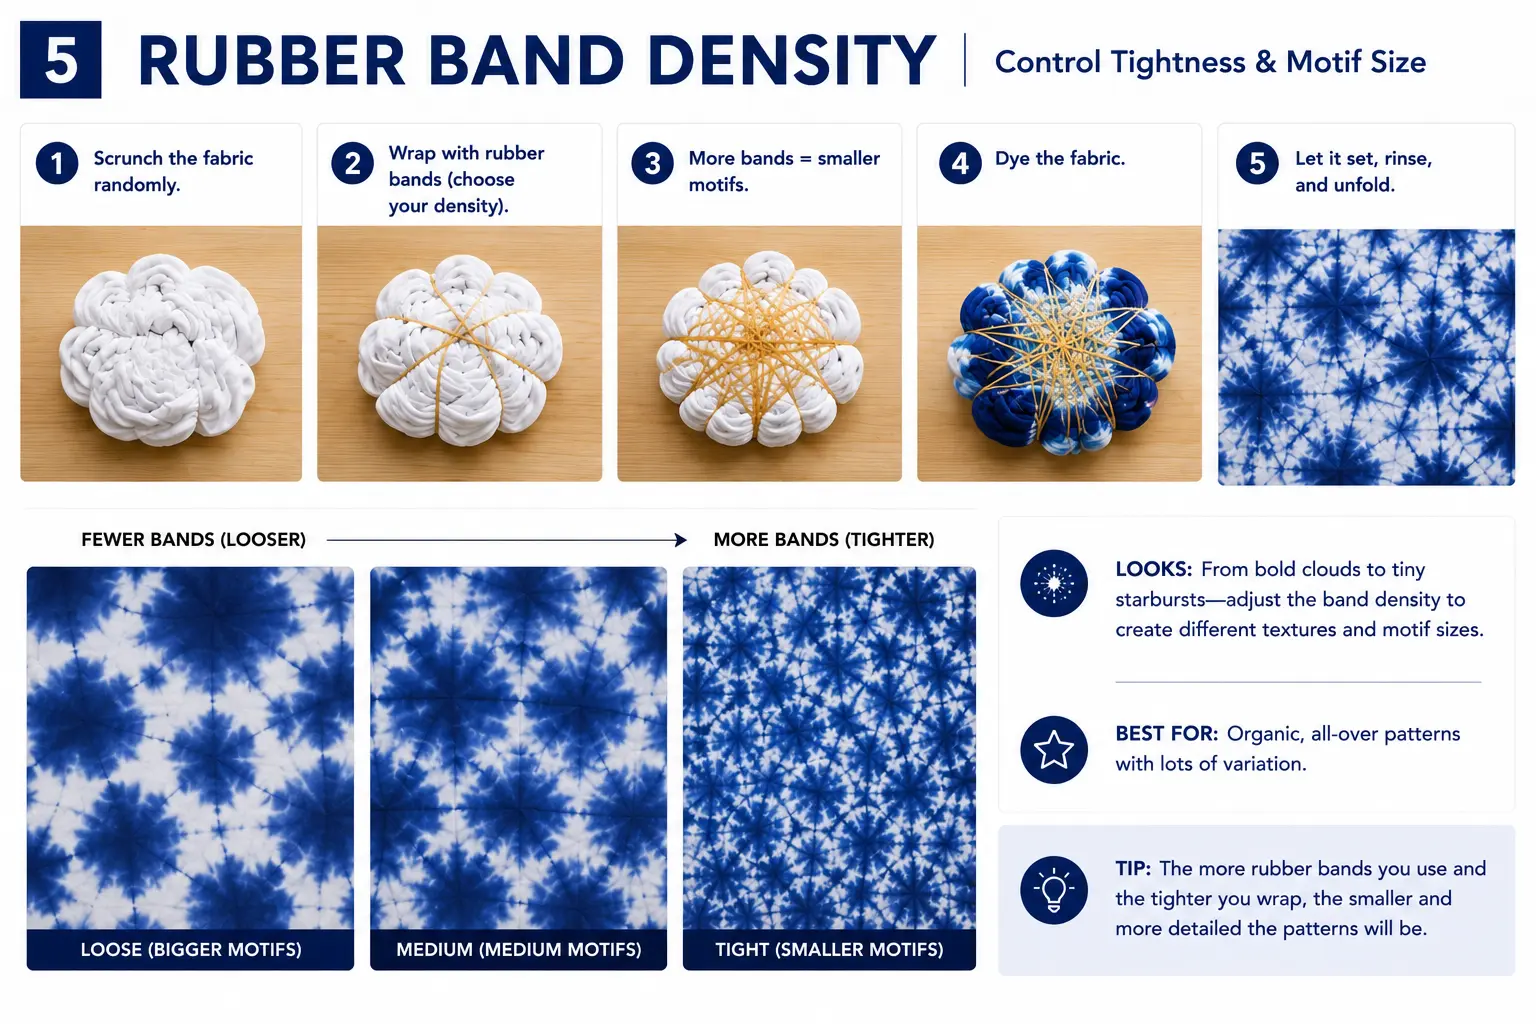
Rubber Band Density
Not one fixed pattern. This method shows how band spacing makes motifs looser, standard, or tighter.
View method →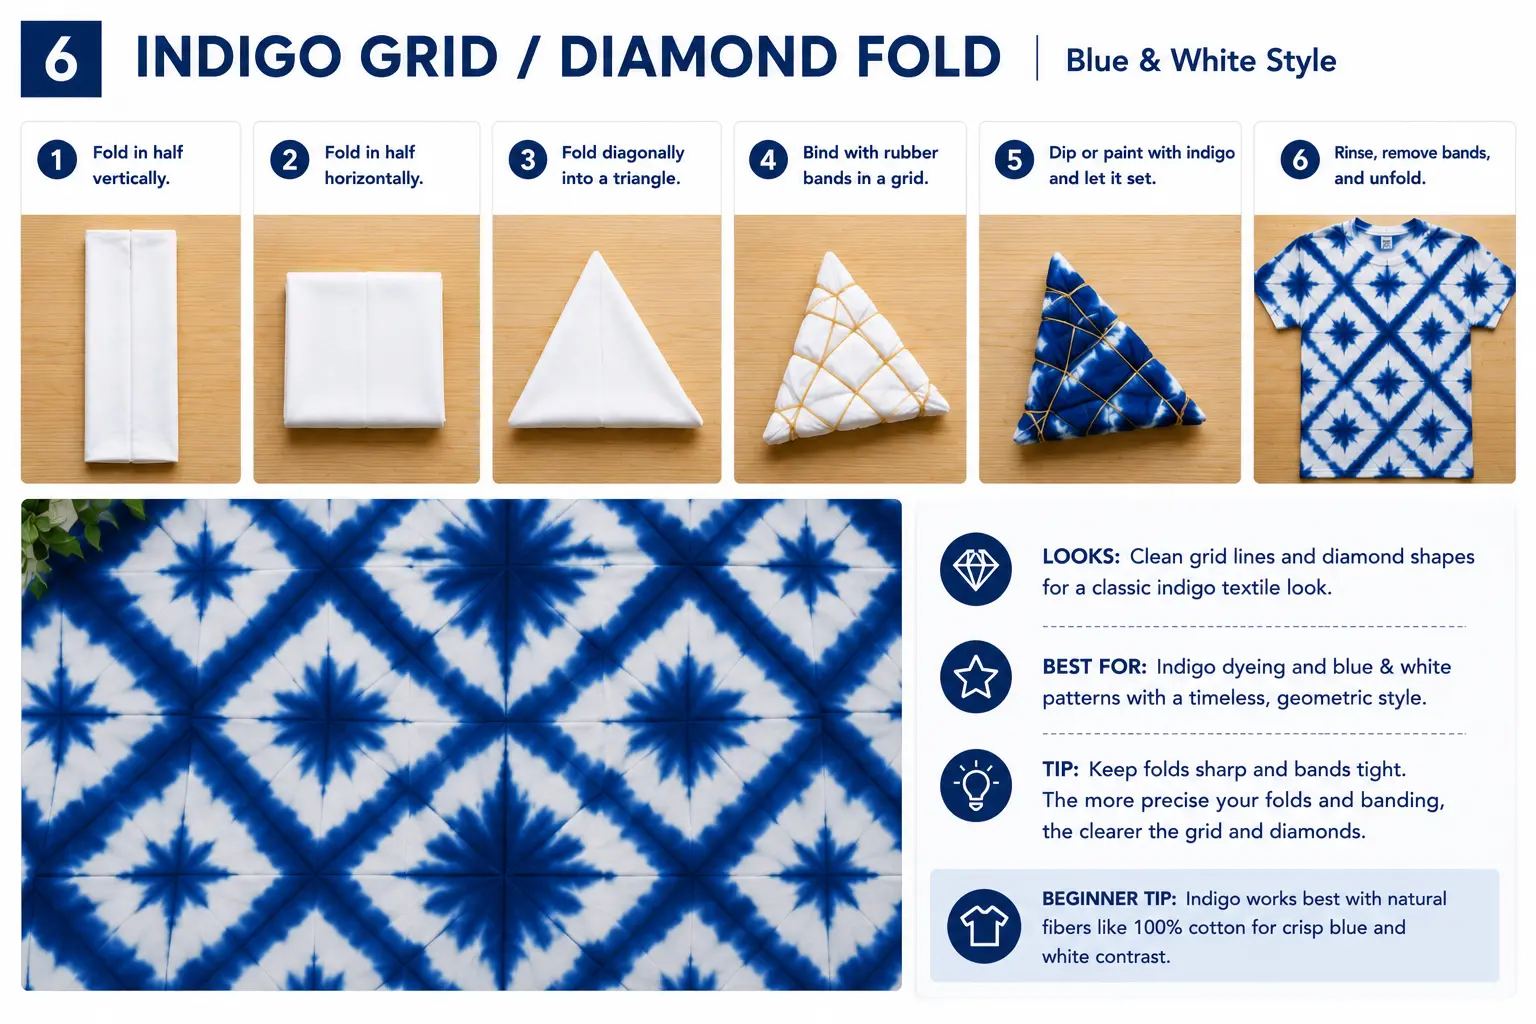
Indigo Grid or Diamond Fold
Blue-and-white patterns inspired by Chinese resist-dye textiles.
View method →Crumple Fold for a Soft Beginner Pattern
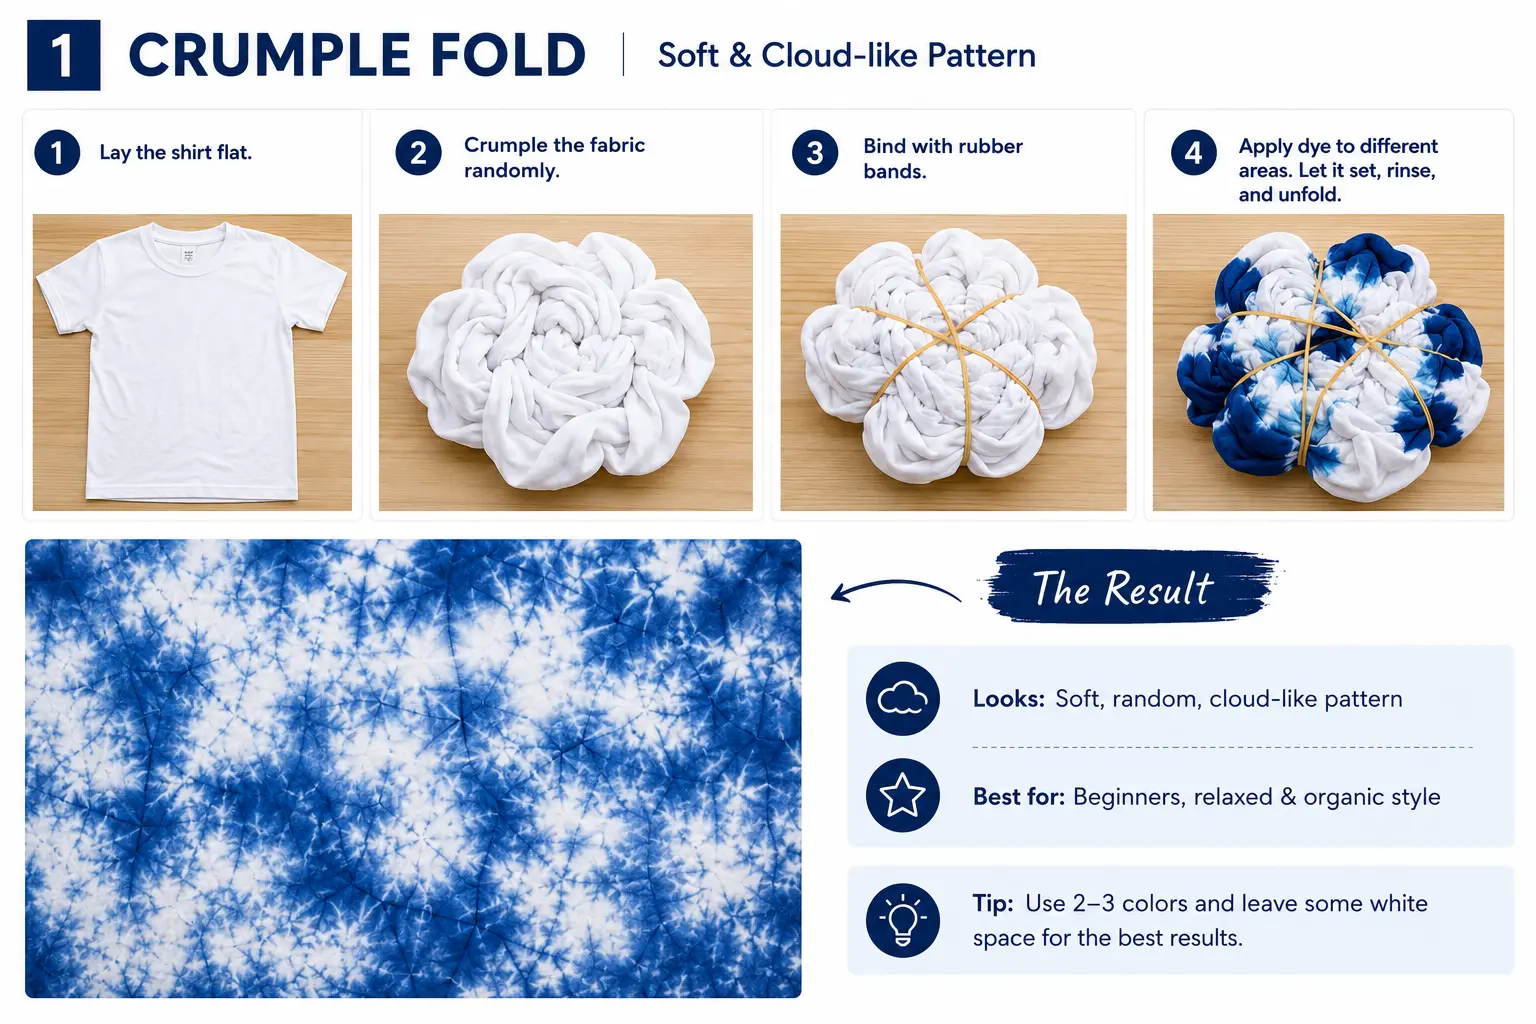
Crumple tie dye is still the easiest starting point because it looks good even when the folds are uneven. It is less controlled than Chinese-style geometric resist dye, but it helps beginners understand how dye spreads through gathered fabric.
- Lay the shirt flat on your work surface.
- Scrunch the fabric into loose, uneven folds.
- Add a few rubber bands to hold the shape.
- Apply dye in small sections instead of soaking the whole shirt.
- Leave some white space for a cleaner result.
Spiral or Circle Fold for a Classic Tie Dye Look
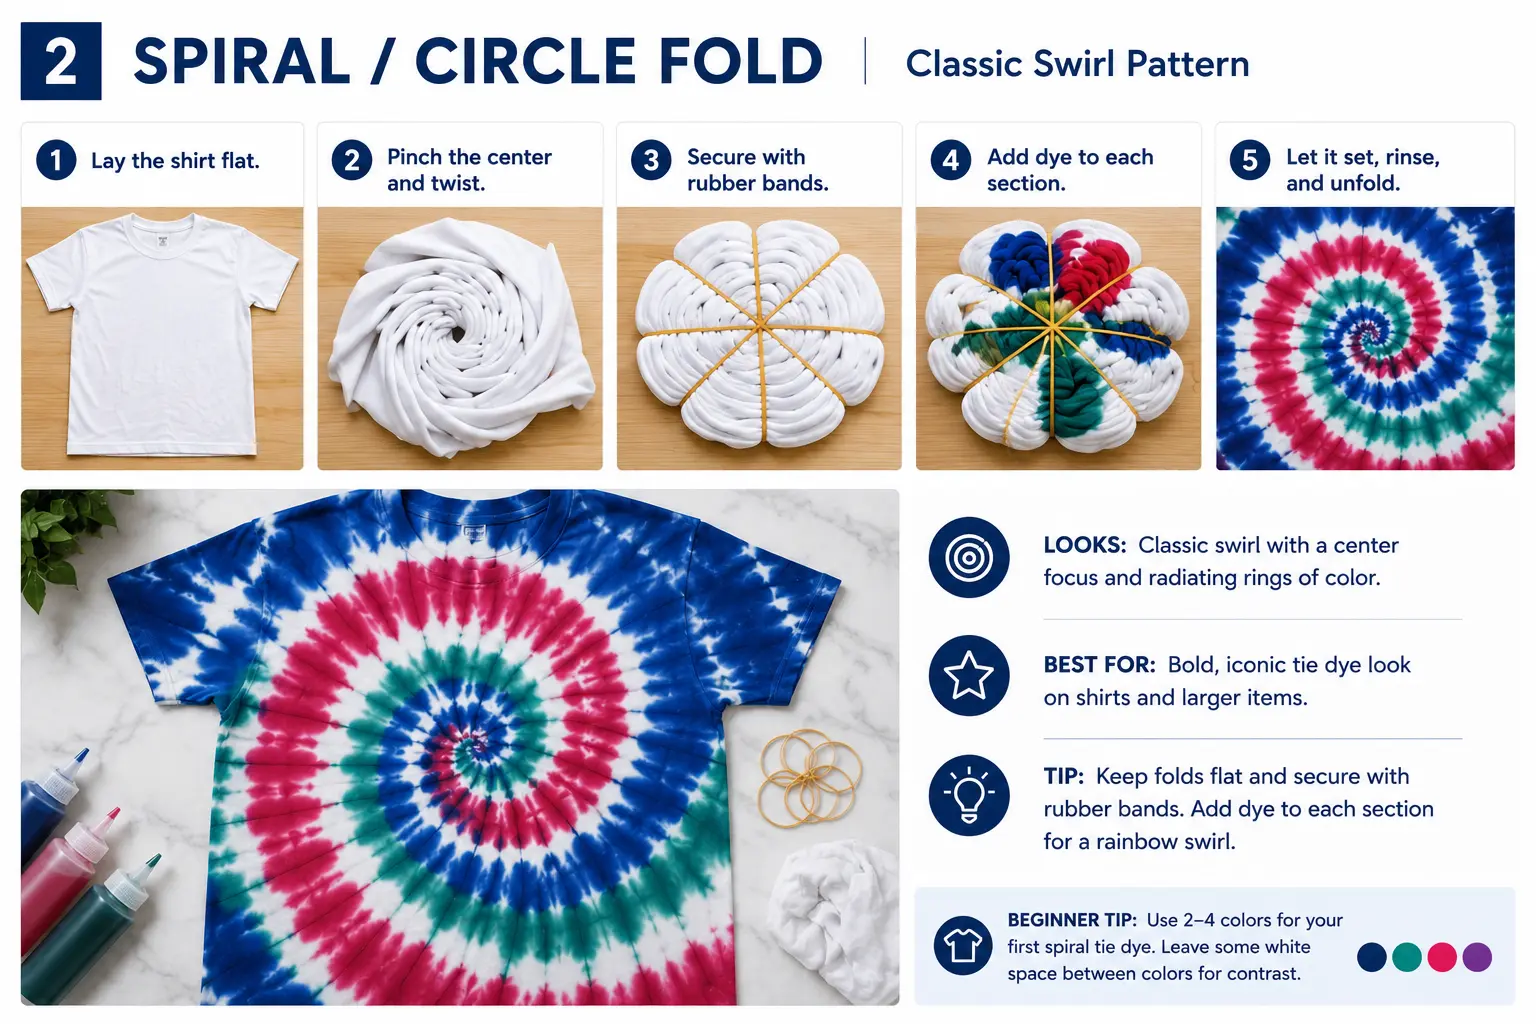
Spiral tie dye is the classic Western-style pattern, but it also teaches an important resist-dye idea: a strong center point can control the whole design.
- Pinch the center of the shirt where you want the spiral to begin.
- Twist slowly until the fabric forms a flat round shape.
- Keep the folds even and flat.
- Secure the spiral with rubber bands like pie slices.
- Add dye to different sections while leaving some white space.
Triangle Fold for Repeating Stars, Flowers, and Diamonds
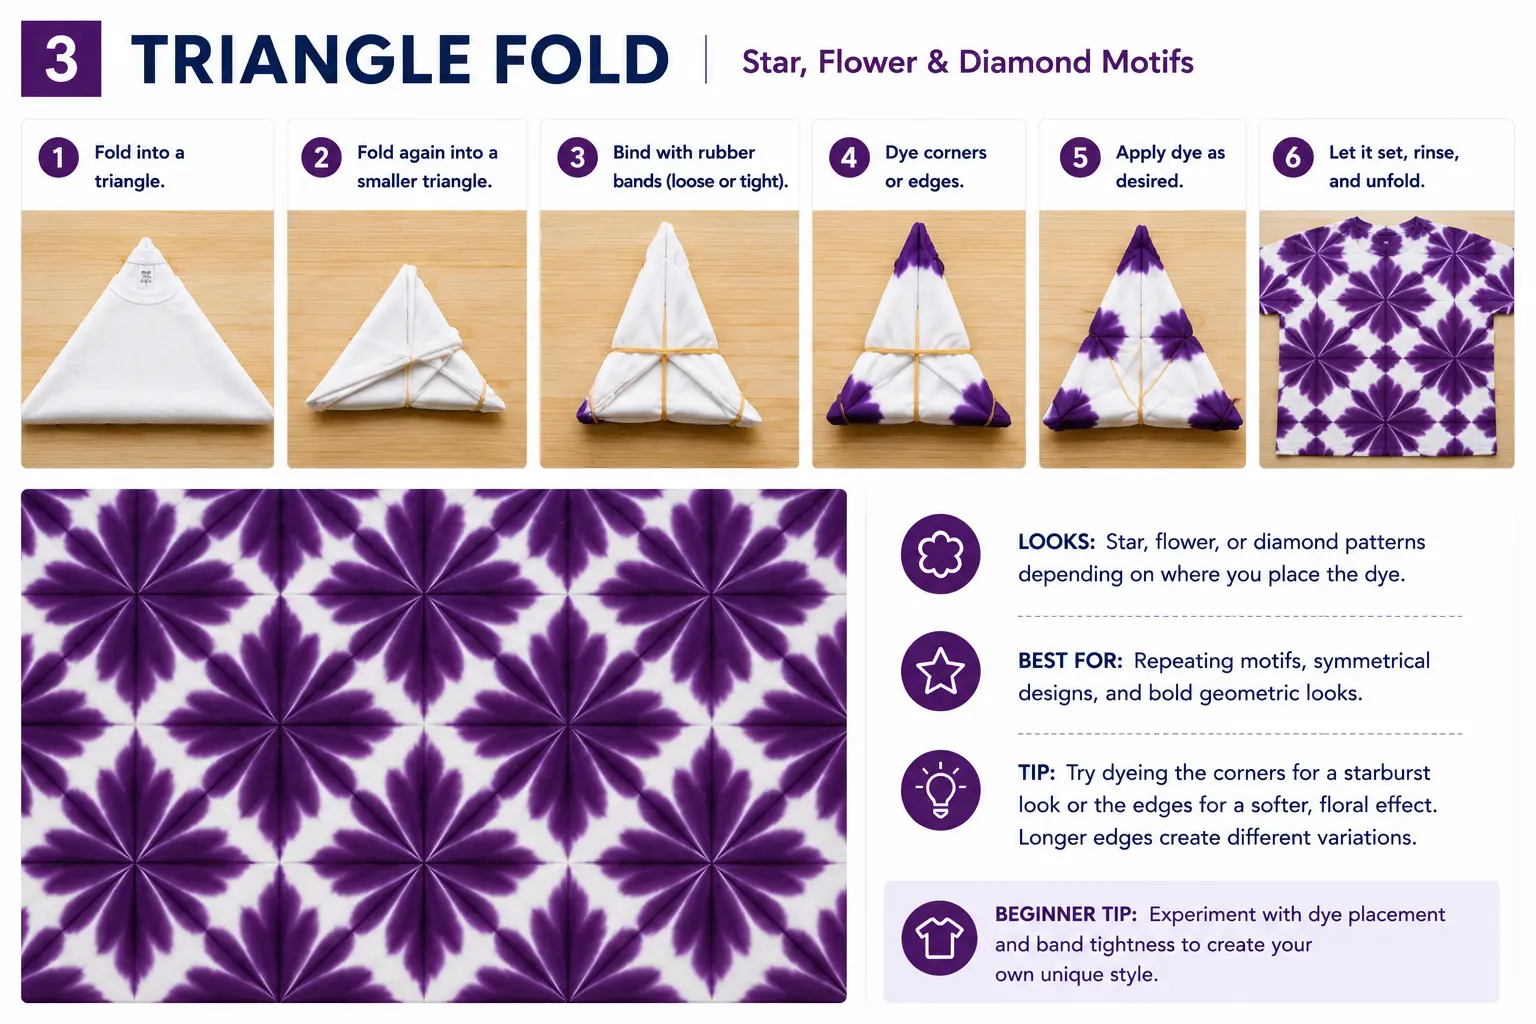
Triangle folding is one of the most useful ways to make tie dye patterns look more intentional. Instead of a random shirt pattern, the fabric repeats a folded shape. This can create star-like, flower-like, diamond, or lattice effects.
- Fold the fabric into a long strip or square section first.
- Fold the strip back and forth into a triangle.
- Keep the triangle edges aligned as much as possible.
- Bind the triangle loosely, normally, or tightly depending on the effect you want.
- Dye the corners, long edge, or selected sides to change the final motif.
Clamp Resist for Sharper Geometric Patterns
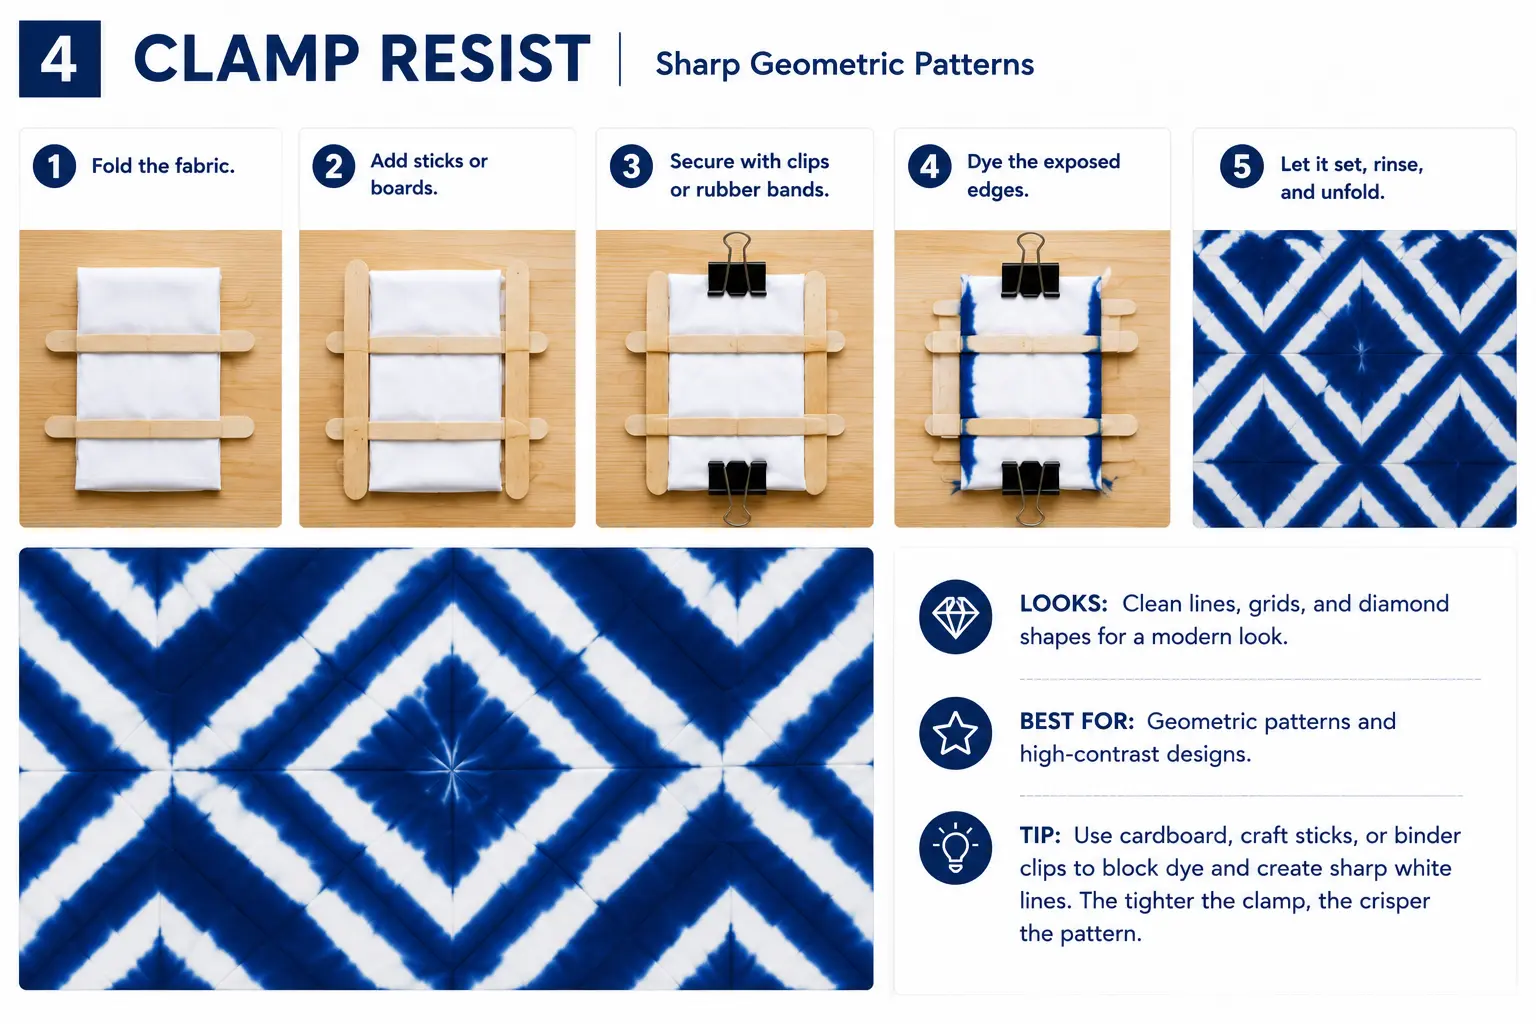
Clamp resist uses pressure to block dye. Small wooden boards, cardboard pieces, craft sticks, binder clips, or clamps can hold folded fabric more firmly than rubber bands alone. This creates sharper white spaces and more geometric results.
- Fold the fabric into a square, triangle, or narrow strip.
- Place small boards, cardboard, or craft sticks on both sides.
- Secure the bundle with clips, rubber bands, or clamps.
- Apply dye to exposed edges or corners.
- Open the fabric after rinsing to reveal the blocked white areas.
Use Rubber Band Density to Make Patterns Loose or Tight
One useful idea from traditional resist-dye practice is that pattern density depends on how many rubber bands you use and how wide each tied section is. This is why the same fold can look loose, standard, or very tight. This is not a single fixed tie dye pattern. It is a control method that changes the density and spacing of many patterns.
- Use fewer bands if you want larger and softer shapes.
- Use more bands if you want smaller and tighter motifs.
- Leave wider spaces between bands for a looser pattern.
- Use narrow spacing for denser repeated details.
- Keep tension even so the final pattern does not feel accidental.
Try an Indigo-Inspired Grid or Diamond Fold
If you do not like neon rainbow tie dye, try a quieter indigo-inspired direction. Blue-and-white tie dye patterns can look more refined, geometric, and handmade without feeling too loud.
- Fold the fabric into a square, strip, or triangle.
- Use rubber bands, craft sticks, or cardboard to create blocked areas.
- Apply blue dye to exposed edges or selected corners.
- Leave enough white space so the pattern stays clear.
- Repeat dyeing or extend contact time if you want deeper blue.
Dye Placement Matters More Than the Pattern Name
A common beginner mistake is thinking that a pattern comes only from the fold. In reality, the same fold can create different results depending on where the dye is placed.
Creates center points and star-like repeats
Dyeing only the corner of a folded triangle often creates small repeated points or flower-like marks after opening.
Creates lines, borders, and lattice effects
Adding dye along the long folded edge can create more linear or grid-like pattern movement.
Creates lighter, more uneven color
A fast dip gives a softer color effect, especially if the fabric is already damp.
Creates deeper and more controlled color
A slower, more careful dye application helps build stronger blue or sharper contrast.
Which Tie Dye Pattern Method Should You Try First?
Choose the method based on the result you want. A beginner-friendly pattern should be easy to fold, easy to dye, and forgiving if the color spreads.
Why Does My Tie Dye Pattern Look Blurry or Too Loose?
Tie dye patterns usually become blurry when the folds are too loose, the fabric is too wet, the dye spreads too far, or the color placement is not controlled. A soft handmade edge is normal, but a completely muddy pattern usually means the structure needs to be stronger.
Very wet fabric lets dye travel quickly, which can blur white spaces and folded lines.
Loose bands create larger, softer motifs. For sharper shapes, bind more tightly.
If you want geometric shapes, rubber bands alone may not block enough dye.
Flooding every section can remove contrast and make shapes disappear.
Too many colors in one fold can muddy the final pattern.
Rinsing too soon can weaken color and make the pattern less visible.
FAQ: Easy Tie Dye Patterns and Folding Ideas
What is the easiest tie dye pattern?
The easiest tie dye pattern is usually crumple tie dye because it does not require perfect folding. It is the best first project for beginners.
What tie dye pattern should beginners try first?
Beginners should start with crumple, then try spiral or triangle folds. If you want a cleaner geometric pattern, try a simple clamp resist fold with cardboard or craft sticks.
What is clamp resist tie dye?
Clamp resist tie dye uses pressure from boards, clips, cardboard, craft sticks, or clamps to block dye. It can create sharper white spaces, grids, diamonds, and geometric patterns.
How do rubber bands change tie dye patterns?
Rubber bands control pattern density. Fewer bands create looser, larger motifs. More bands and narrower spacing create tighter, smaller, more detailed motifs.
How do I make tie dye patterns more geometric?
Use triangle folds, square folds, accordion folds, and clamp resist. Keep the folds aligned, apply pressure with boards or clips, and dye only selected edges or corners.
Can I make Chinese-inspired tie dye patterns as a beginner?
Yes. Start with simple blue-and-white triangle folds, rubber bands, or craft-stick clamps. Avoid complex circular or mandala-like patterns until you understand folding and dye placement.
How do I get a blue-and-white indigo-style look?
Use one blue dye color, leave strong white spaces, and choose triangle folds, clamp resist, or grid folds. Keep the color palette simple so the pattern structure stays visible.
Why does my tie dye pattern look blurry?
The most common reasons are too much water, loose bands, too much dye, too many colors, weak clamp pressure, or rinsing too early.
Final Thoughts
The best easy tie dye patterns are not just colorful. They are easy to fold, easy to control, and easy to repeat.
Easy tie dye patterns do not have to look random or messy. Once you understand folding, tying, clamping, dye placement, and color timing, you can make beginner-friendly patterns that feel much more intentional.
Start with crumple or spiral if you want a simple first project. Try triangle folds, rubber-band density, and clamp resist when you want repeated motifs, sharper white lines, or a quieter blue-and-white handmade look.
Once your pattern is finished, protect the result by learning how to wash tie dye without ruining the color and how to keep tie dye from fading.