Cool Tie Dye Patterns: 7 Unique Step-by-Step Ideas Beyond Basic Spirals
Already tried simple crumple or spiral tie dye? Use this page to pick a cooler tie dye pattern by look: geometric, blue-white, repeated, clamped, mandala-style, or Bai-inspired.
Instead of reading every pattern from top to bottom, start with the result you want, jump to that method, then use the quick path inside each card.
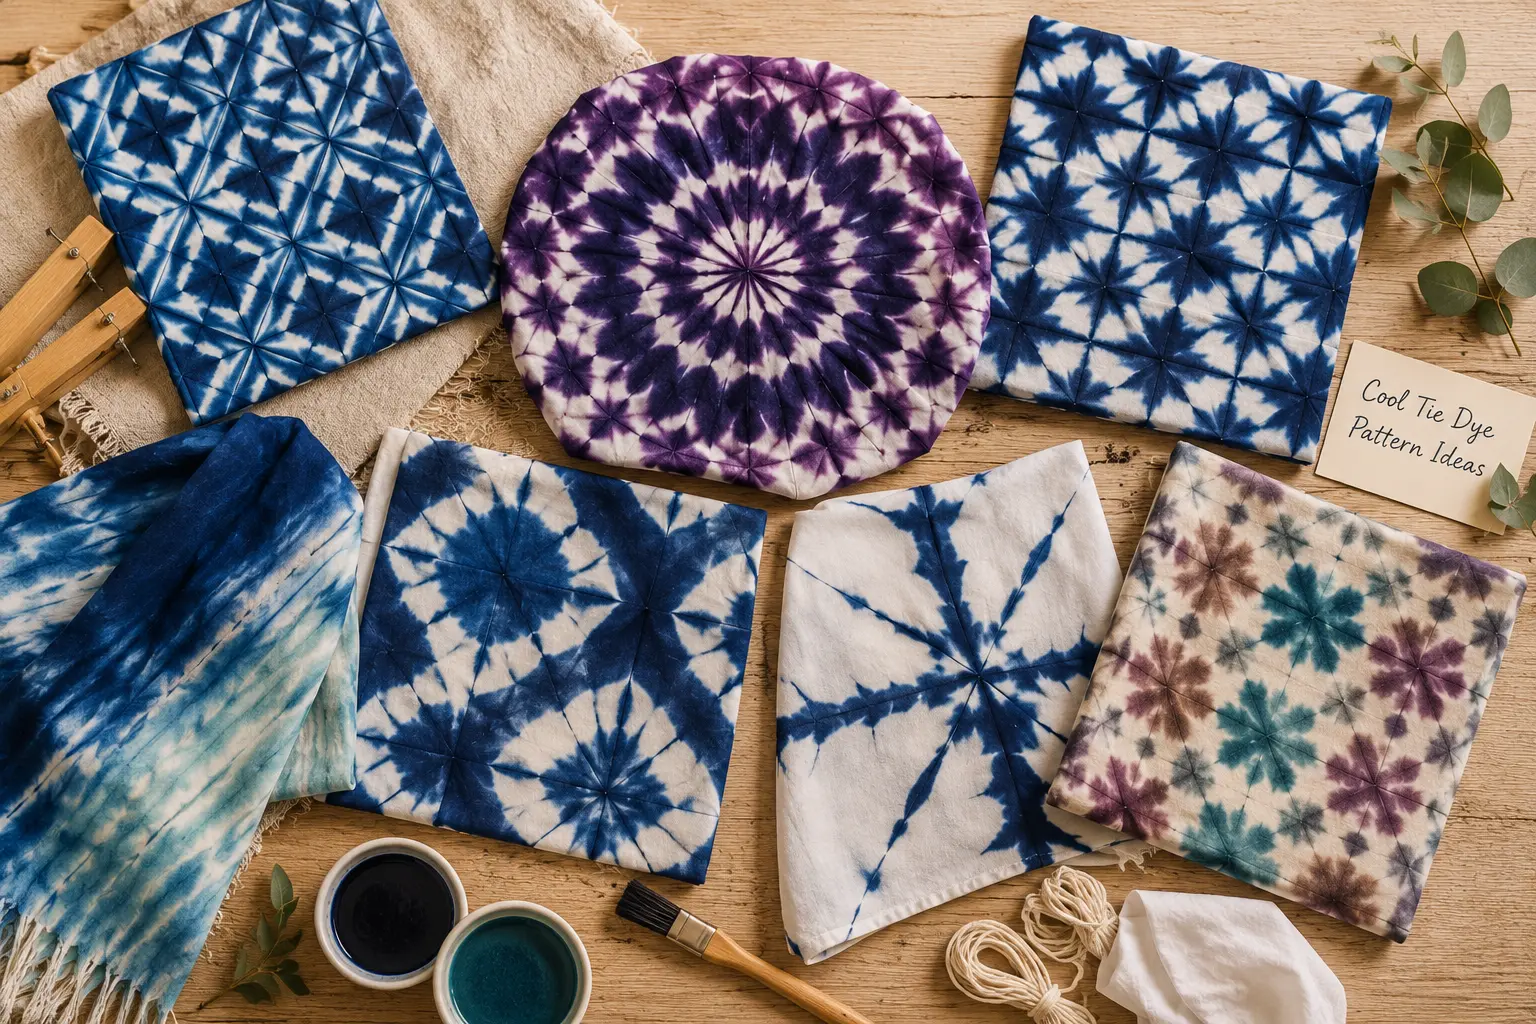
7 Cool Tie Dye Patterns, From Structured Folds to Cultural Resist Ideas
If you are looking for the easiest beginner folds, start with easy tie dye patterns first. This guide is for more structured, design-focused patterns.
Not sure where this pattern fits in your project? Use our Tie Dye Guide to plan the full path: choose a pattern, check waiting time, rinse and wash safely, prevent fading, fix mistakes, or review safety.
Pick the Cool Pattern That Matches the Result You Want
Use this as the shortcut map. Most readers do not need all seven methods at once. Pick the visual goal first, then jump straight to the pattern that solves it.
Use board pressure or clamp-resist logic so the white space stays readable.
Go to Board-Clamped Triangle → Repeat effect I want a repeated star or grid-like result.Fold into a compact square bundle, bind pressure points, then dye the exposed edges.
Go to Indigo Star Repeat → Circular focus I want a mandala-style center.Start with wedge folding and tied sections before trying complex color placement.
Go to Mandala-Inspired Tie Dye → Color control I want the colors to feel planned, not random.Use triangle color placement to decide where each color appears when the cloth opens.
Go to Triangle Color Placement → Blue-white craft look I want a calmer, Bai-inspired textile feeling.Try stick-and-band resist for a handmade blue-white effect without claiming historical reproduction.
Go to Bai-Style Stick & Band → Too advanced? I need the easier pattern selector first.Start with crumple, spiral, triangle fold, clamp resist, band density, and indigo grid basics.
Go to Easy Tie Dye Patterns →Reader path: Easy patterns → cool pattern selector → one method → timing, washing, fading, or mistake-fixing guide. This keeps the page from becoming a long pattern museum.
What Makes a Tie Dye Pattern Look Cool?
Cool tie dye patterns are made by controlling fold structure, dye placement, pressure, and white space. Instead of adding more random colors, use mandala folds, triangle color placement, clamp-resist grids, board-clamped folds, and stick-and-band layouts to create cleaner, more unique designs.
Cool tie dye is built, not guessed. Start with one clear structure, decide where the dye should enter, leave enough white space, and choose a pattern that fits the object you want to make.
Some blue-white and clamp-resist ideas here are inspired by broader Chinese resist-dyeing logic and Dali Bai indigo tie dye. For cultural context, Xinhua describes Bai tie-dye as a traditional folk technique of the Bai ethnic group and notes its national intangible cultural heritage status in this overview of Bai tie-dye art in Yunnan. This guide uses beginner-friendly modern adaptations, not exact historical reproductions.
Tools, Fabric, and Design Rules for Better-Looking Results
These patterns are not meant to replace beginner folds. They are the next step after you already understand simple spirals, crumples, stripes, or basic folding ideas.
Use Cotton or Linen
Natural fibers usually hold dye better than polyester-heavy blends. Thin or medium cotton is easier to fold, clamp, and bind cleanly.
Choose Structure First
Decide whether you want circles, repeats, grids, triangle geometry, or blue-white resist effects before choosing colors.
Use Fewer Colors
Many cool tie dye patterns look stronger with one color, two colors, or three clear placement zones instead of a full rainbow.
Control the Resist
Rubber bands, string, boards, clamps, and sticks all work by blocking dye from reaching selected areas of the cloth.
For indigo projects, fabric preparation matters. Utah State University Extension explains that proper scouring helps fibers accept dye more evenly when preparing fabric for indigo dyeing.
Need the basic timing and care first? See how long tie dye should sit before rinsing, then learn how to wash tie dye without ruining the color.
7 Cool Tie Dye Patterns to Try
Each pattern below has a different design purpose: circular structure, star repeats, board-clamped geometry, color placement, clamp-resist grids, blue-white round patterns, or Bai-style stick-and-band resist ideas.
Structured Folds
Start here if you want more control than a basic spiral but still want familiar folding and tying methods.
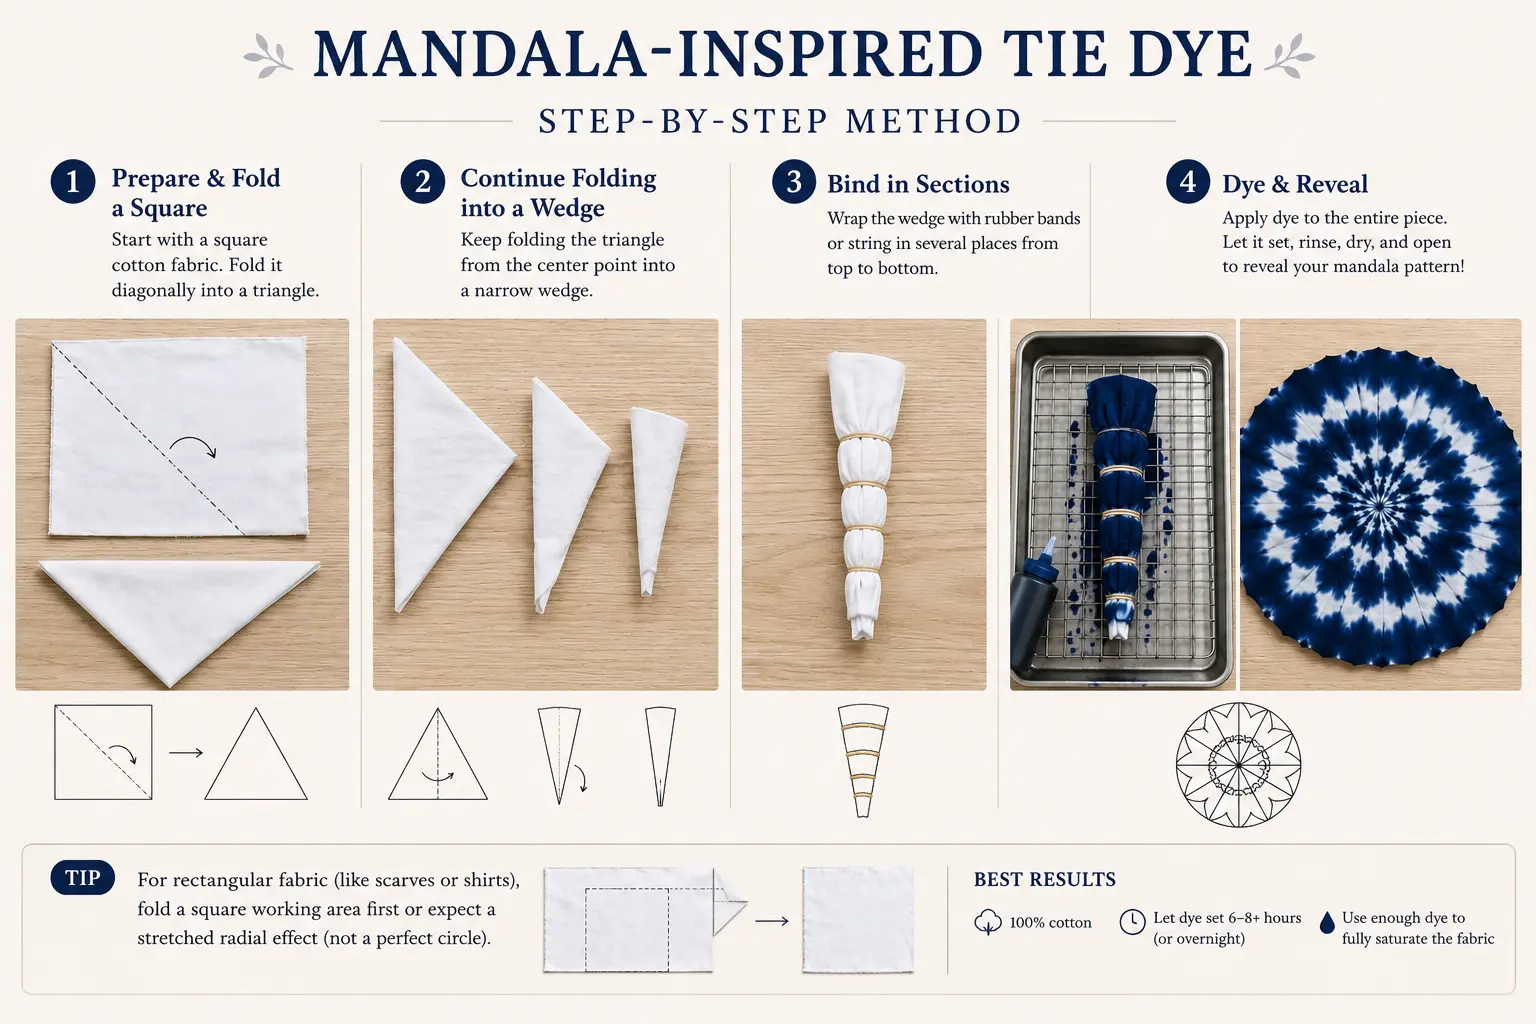
Mandala-Inspired Tie Dye
Pattern tips
- Watch out: Do not start with a rectangle unless you are comfortable with a stretched or partial mandala effect.
- Beginner-safe variation: Use one indigo or navy shade first. Add extra colors only after you understand where the rings appear.
- Design note: The final mandala will vary with fabric shape, tie spacing, dye amount, and how tightly the wedge is folded.
A square cloth folds into a wedge, then tied sections become circular rings when the fabric opens.
Each tied section blocks or slows dye. When the wedge opens, those tied sections repeat around the center as rings.
Circular rings, a clear center, and a more intentional textile-art result than a basic spiral.
Square cotton cloth, rubber bands or cotton string, and one strong dye color.
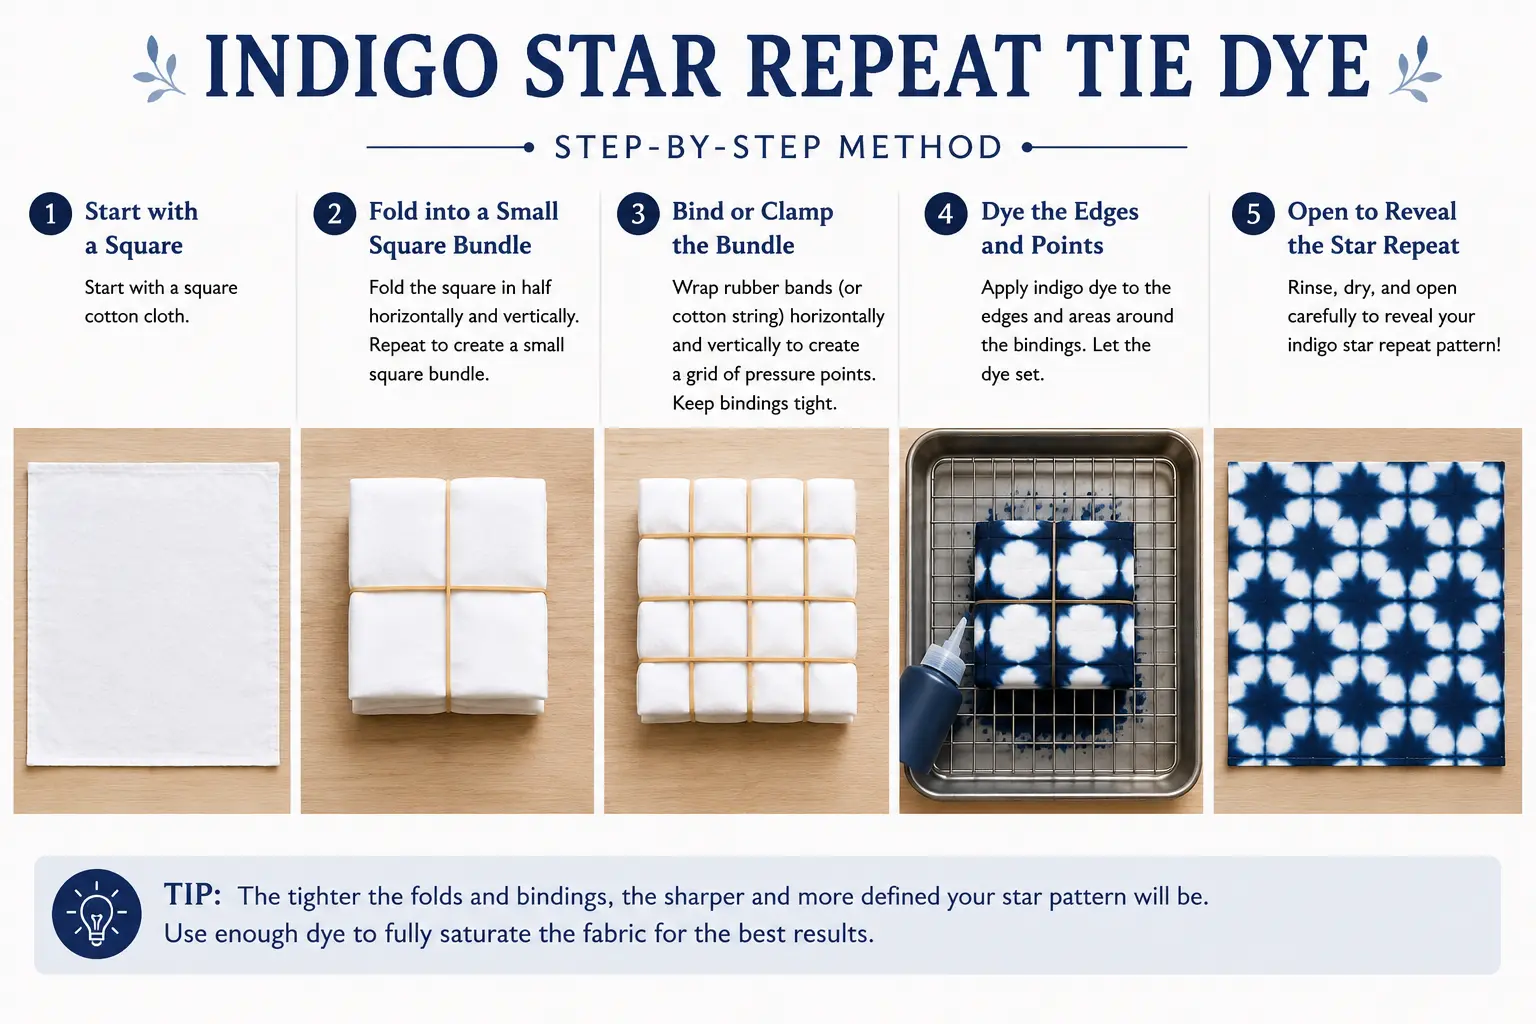
Indigo Star Repeat Tie Dye
Pattern tips
- Watch out: Loose folding can make the repeated marks look blurry or uneven.
- Beginner-safe variation: Try it on a smaller practice square before using a shirt or scarf.
- Design note: This method is best treated as a repeat-pattern test before you scale it to a larger shirt or scarf.
A folded square bundle and rubber-band grid create pressure points that open into a repeated blue-white star effect.
The folded layers mirror the same pressure points across the cloth. Dye enters the exposed areas, while tied sections preserve lighter marks.
A blue-white repeat pattern with more structure than random crumple dye.
Square cotton cloth, rubber bands or cotton string, and indigo or navy dye.
Pressure, Boards, and Color Placement
These methods show how pressure and dye location create crisp geometry instead of random color clouds.
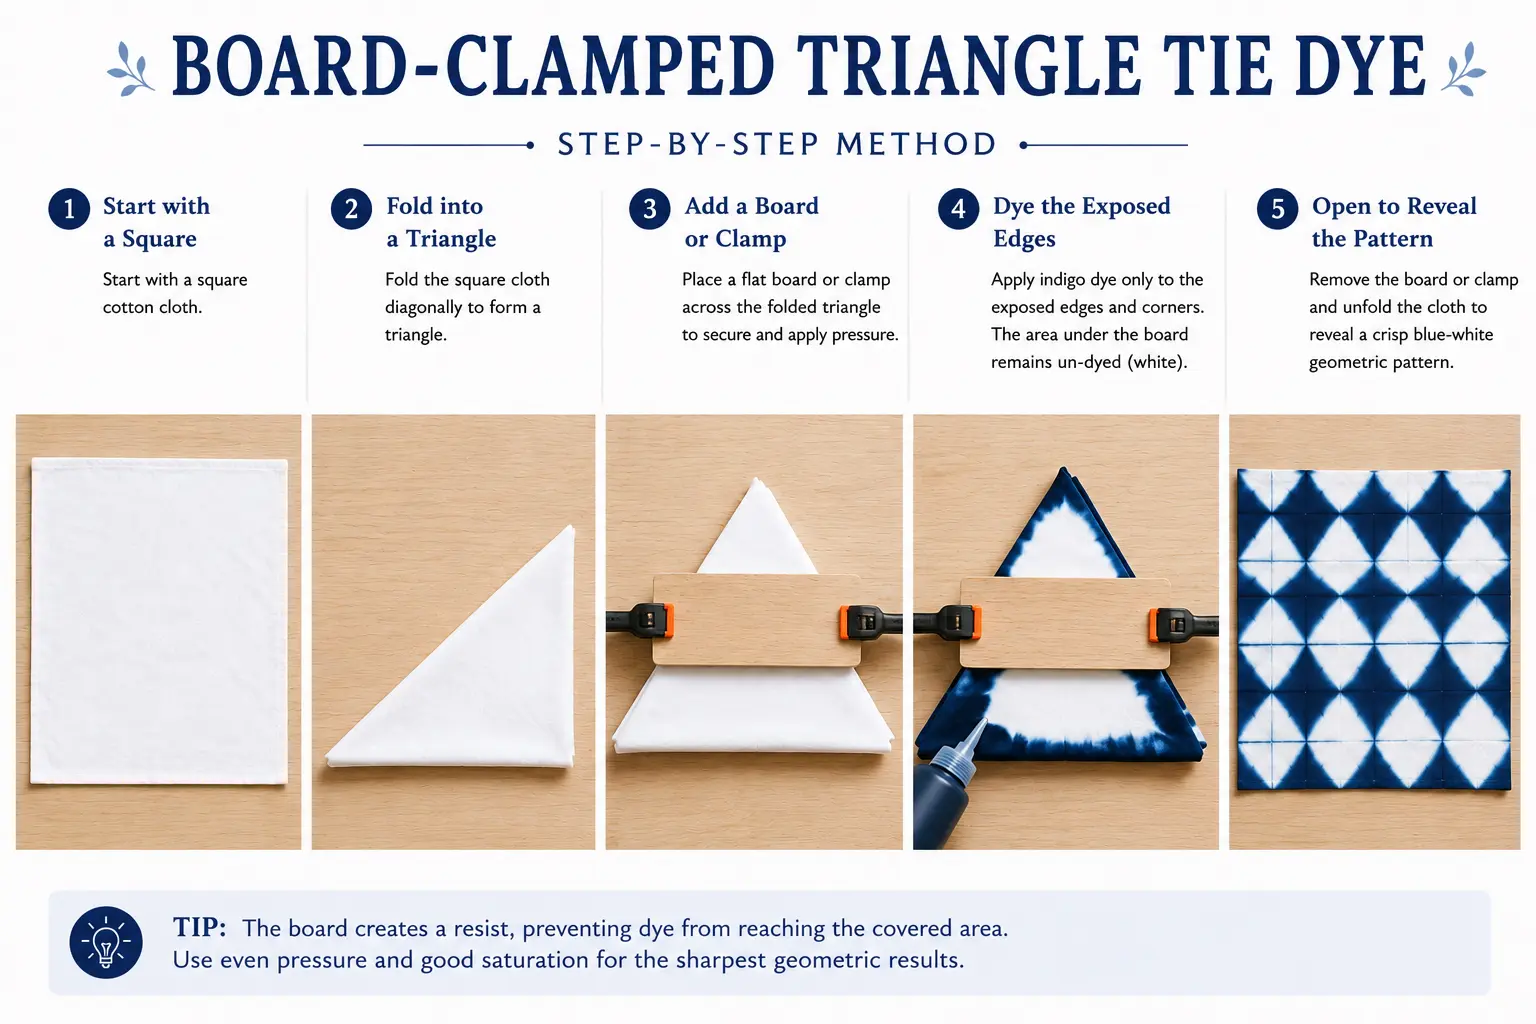
Board-Clamped Triangle Tie Dye
Pattern tips
- Watch out: If dye floods the covered area, the sharp resist effect becomes soft and unclear.
- Beginner-safe variation: Move the board slightly higher or lower on the triangle to change the size of the white resist area.
- Design note: Board position controls how much white space survives, so change one variable at a time.
A folded triangle is pressed with a board so the covered area resists dye while the exposed edges absorb color.
The board protects the covered section. Dye reaches only the exposed edges and corners, then repeats through the folded layers.
Sharper triangle or diamond geometry with strong blue-white contrast.
Square cotton cloth, one small board or clamp, rubber bands, and indigo dye.
Triangle Color Placement Tie Dye
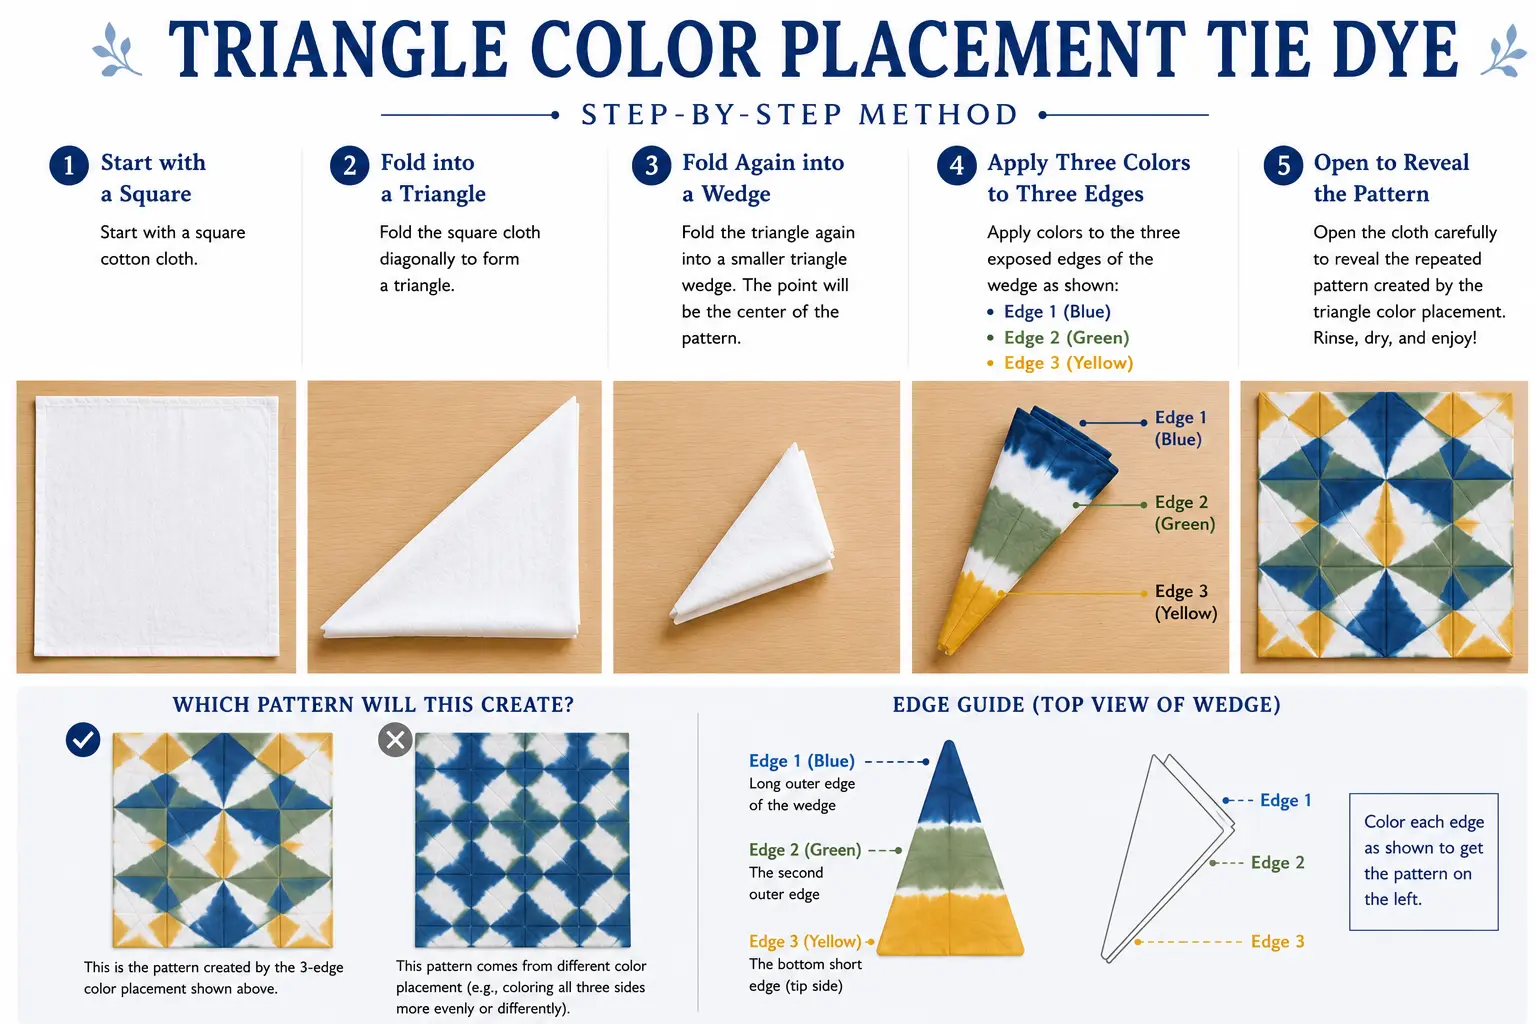
Pattern tips
- Watch out: Too much dye on every side can blur the color map and turn the pattern muddy.
- Beginner-safe variation: Use muted indigo, sage green, and warm ochre first. Avoid neon colors if you want a more grown-up textile feel.
- Design note: The goal is color mapping, not color quantity. Too many colors can hide the geometry.
A folded wedge turns three dyed edges into a repeated geometric color map when opened.
The point of the wedge often maps toward the center, while longer dyed edges repeat across outer or diagonal areas.
A geometric pattern where blue, green, and yellow areas show how dye placement maps onto the opened cloth.
Square cotton cloth, rubber bands, and three clearly separated dye colors.
Indigo, Clamp-Resist, and Cultural Textile Feeling
These ideas lean into blue-white contrast, resist logic, and cultural craft inspiration without claiming exact heritage reproduction.
Indigo Clamp-Resist Grid Tie Dye
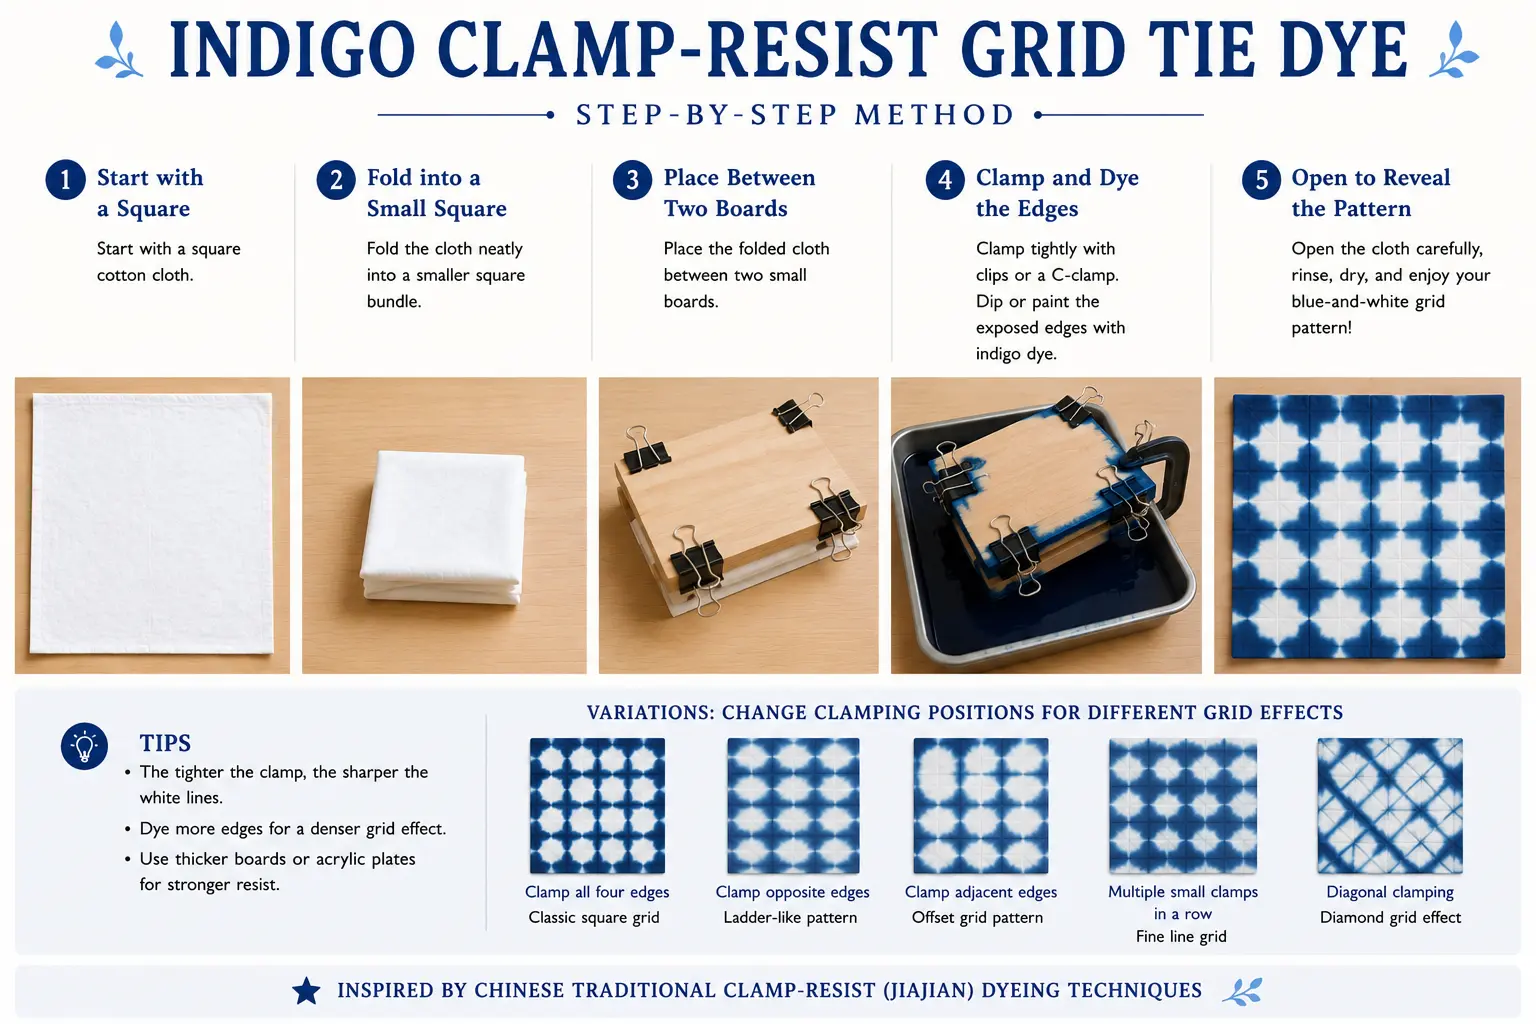
Pattern tips
- Watch out: If the boards are loose, dye can seep under the pressure area and soften the grid.
- Beginner-safe variation: Try binder clips first. C-clamps can create stronger pressure, but they are not required for a beginner test.
- Design note: Stronger pressure usually creates cleaner resist marks, but small leaks can still look handmade.
Boards and clamps create a grid-like blue-white resist effect with a stronger cultural textile feeling.
The boards protect the center of the folded bundle. Exposed edges take dye, then repeat when the cloth opens.
A crisp blue-white grid or geometric repeat that feels closer to textile design than casual T-shirt dyeing.
Small boards, binder clips or clamps, rubber bands, square cotton cloth, and indigo dye.
Blue-and-White Circle Mandala Tie Dye
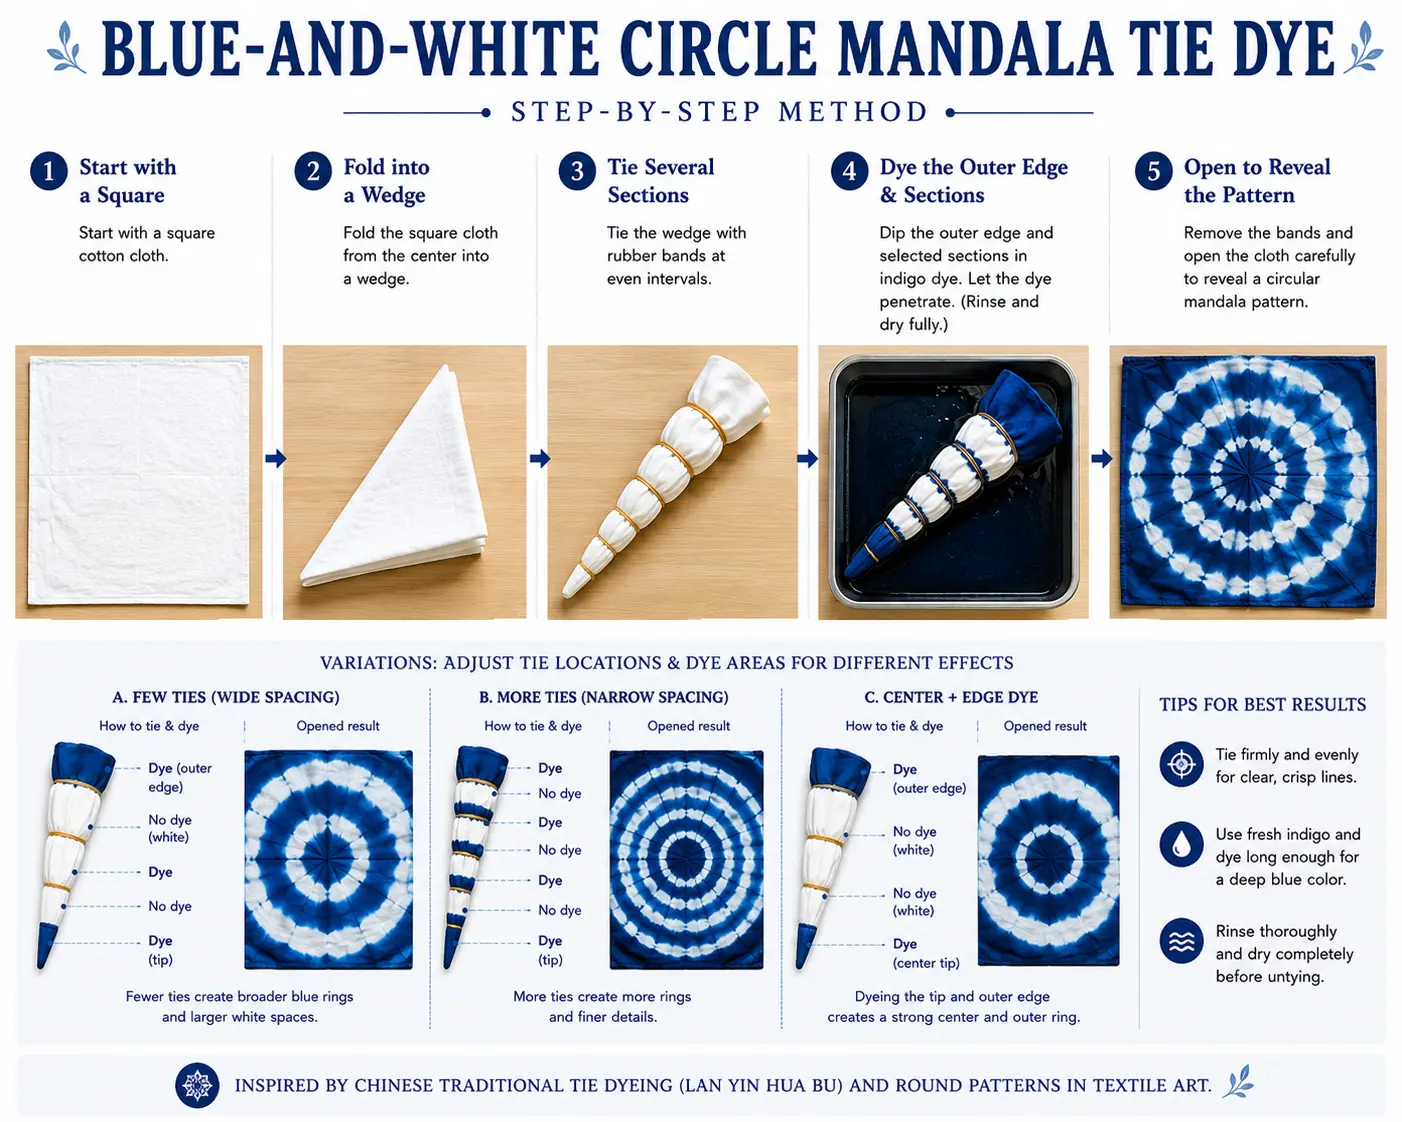
Pattern tips
- Watch out: Uneven ties can make the rings lopsided. That can still look handmade, but it will feel less controlled.
- Beginner-safe variation: Start with one-color edge dye before trying multiple dyed sections.
- Design note: Ring spacing and tie tightness decide whether the result feels soft, bold, or highly structured.
This circular resist style uses tied wedge sections to make a blue-white round pattern with a textile-art feel.
Each tied band creates a resist line. When opened, those lines repeat into circular bands or radial marks.
A centered blue-white roundel that works well on square cloth, scarves, or wall textile samples.
Square cotton cloth, rubber bands or string, and indigo dye.
Bai-Style Stick & Band Tie Dye
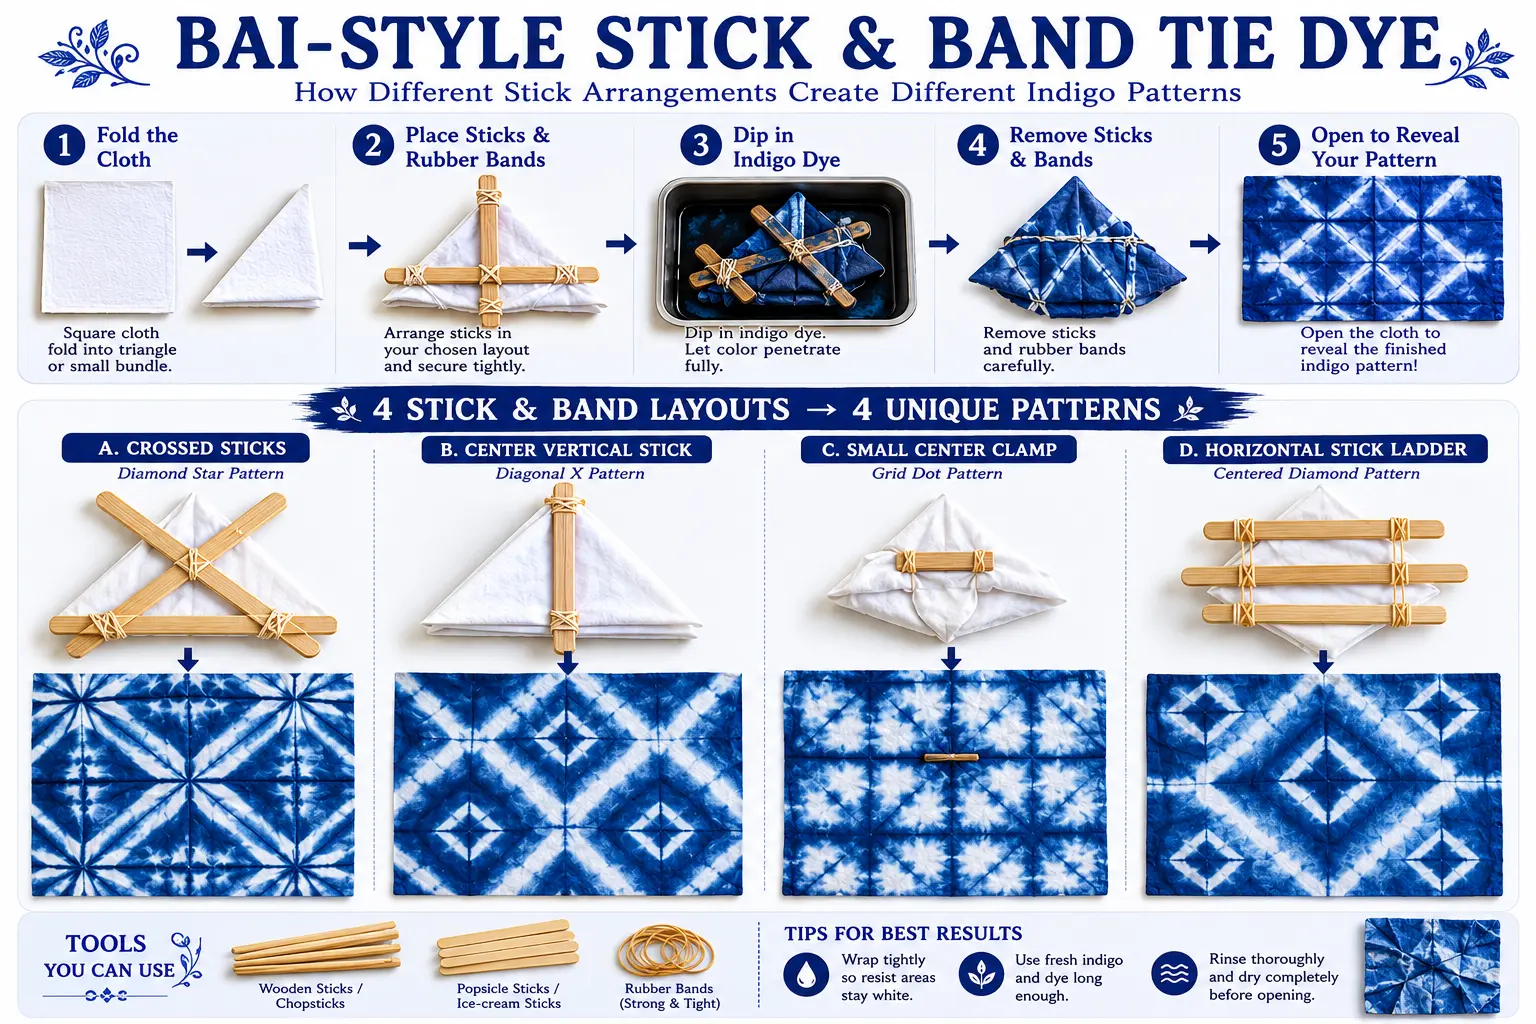
Pattern tips
- Watch out: Do not describe it as a direct copy of a traditional Bai heritage pattern. It is a modern learning version.
- Beginner-safe variation: Try one stick layout at a time. Changing stick direction changes the final geometry.
- Design note: Treat this as a modern learning version inspired by resist logic, not a copy of a heritage pattern.
A stick-and-band resist idea inspired by Dali Bai indigo tie dye and Chinese resist-dyeing logic.
The sticks and bands press into the cloth. Pressed areas resist dye, while exposed folded areas take indigo.
Blue-white geometric effects created with sticks, rubber bands, pressure, and indigo-style dyeing.
Wooden sticks, rubber bands, folded cotton cloth, and indigo dye.
Which Cool Tie Dye Pattern Should You Try First?
Pick the pattern based on your goal. A cool tie dye pattern should match the fabric shape, the tools you have, and the kind of result you want.
| Your Goal | Best Pattern | Why It Works |
|---|---|---|
| You want a circular focal point | Mandala-Inspired or Blue-and-White Circle Mandala | Both use wedge folding and tied sections to create a strong center. |
| You want crisp geometry | Board-Clamped Triangle or Indigo Clamp-Resist Grid | Boards and clamps create pressure, which helps preserve sharper white areas. |
| You want color experiments | Triangle Color Placement | It shows how dye location maps to the final opened pattern. |
| You want cultural textile feeling | Bai-Style Stick & Band Tie Dye | It uses sticks, bands, and indigo-inspired resist logic for a blue-white handmade look. |
| You want a repeat pattern | Indigo Star Repeat or Clamp-Resist Grid | Folding into bundles creates repeated marks when the cloth opens. |
Best when you want a strong center on square cloth, scarf samples, or wall textile pieces.
Best when you want sharper white space, triangles, diamonds, or grid-like repeat marks.
Best when you want to understand how dye location changes the final opened pattern.
Best when you want a blue-white resist effect with handmade craft context.
Best when you want repeated marks from folded bundles, pressure points, and controlled dye edges.
Common Mistakes That Make Cool Patterns Look Messy
Advanced-looking tie dye does not need to be complicated, but it does need control. Most messy results come from too much dye, too many colors, loose folding, or washing too harshly after dyeing.
- Using too many colors too early: start with one color or clear color zones before trying complex palettes.
- Not folding tightly enough: loose folds make repeat patterns blur and lose structure.
- Dyeing every surface: resist patterns need white space and protected areas to stay readable.
- Opening too early: weak setting time can make colors look faded or dull.
- Washing too harshly: strong detergent or hot water can ruin color before the pattern settles.
If a project already looks muddy, faded, or messy, use this guide to fix tie dye mistakes. For care, see how to wash tie dye without ruining the color and how to keep tie dye colors from fading.
Frequently Asked Questions About Cool Tie Dye Patterns
What are the coolest tie dye patterns for beginners?
Mandala-inspired folds, triangle color placement, and simple clamp-resist patterns are good next-step options because they look structured without requiring professional tools.
How do I make tie dye look more unique?
Use fewer colors, stronger folds, clearer white space, clamp-resist tools, and more intentional dye placement. Randomly adding more dye usually makes the result look messier, not cooler.
What is the difference between cool and easy tie dye patterns?
Easy tie dye patterns focus on simple folding and low-pressure results. Cool tie dye patterns focus more on structure, contrast, repeat, resist control, and textile-design feeling.
Can I make cool tie dye patterns with only one color?
Yes. Indigo, navy, or another deep color can create strong blue-white patterns when the folding and resist areas are clear. One-color tie dye often looks more mature than a crowded rainbow palette.
Are these traditional Chinese tie dye patterns?
Some ideas are inspired by Chinese resist-dyeing logic and Dali Bai indigo tie dye, but this article presents beginner-friendly modern interpretations rather than exact historical reproductions.
Which tie dye pattern is best for a scarf or wall textile?
Clamp-resist grid, Bai-style stick-and-band, and blue-and-white circular resist patterns work especially well on square cloth, scarves, and wall textiles because the pattern reads as a full fabric design.
What should I try after easy tie dye patterns?
Try a mandala-inspired fold, a triangle color placement test, or a simple board-clamped pattern. These teach you how folding, pressure, and dye placement affect the final result.
Build the Pattern Before You Add More Color
A cool tie dye pattern is usually built, not guessed. Start with one clear structure, control where the dye can enter, leave enough white space, and choose a pattern that fits the object you want to make.
Interested in more cultural craft context? You may also like is Chinese tie-dye natural? and traditional Chinese crafts.